Saturday, May 31, 2014

Visualforce Multiselect Drop-down Menu with jQuery Multiselect

Introduction


Building powerful user interactive  GUI (Graphical User Interfaces) requires letting your users have more control over the content they are consuming. This can be done by letting them filter the content to see only what they are interested it. Following my post on customizable drop-down Menus using jQuery Minimalect, I will show you today how to build even more powerful and more interactive drop-dowm menus that let users filter the content they are viewing by specify multiple options at once. This feature is called multi-select. For this article and demonstration I will use jQuery library or plugin call Multiselect.

When building Web applications that are heavy on user interaction, just be careful that the heavy user interaction isn't implemented at the expense of  performance, usability etc. Plan your application carefully before you begin implementing anything. Always remember, JUST BECAUSE YOU CAN DO IT, DOES NOT MEAN YOU SHOULD DO IT.

Use Case

As a use case, imagine you are building a custom Visualforce page which let's your Users browse Opportunities. Since Users in your organization work on opportunities at different stages, they might want to filter opportunities by stages. In this demonstration, we will create a multi-select drop-down Menu, which lets Users request only Opportunities they are interested in by specify the opportunity stages. Our end result looks like this.


So let's dive in.

Apex


Begin by using the Schema.DescribefieldResult to get and return a list of all stage names. This will be used on the page to build the multi-select drop-down. Use the Schema.DescribefieldResult  as opposed to hard coding your stages, so that you will not have to change your code, when the stages in your organization are customized.

1:  public List<String> opportunityStages {  
2:       get {  
3:            if(opportunityStages == null){  
4:                 opportunityStages = new List<String>();  
5:                 Schema.Describefieldresult stageNameField = Opportunity.StageName.getDescribe();  
6:                 List<Schema.Picklistentry> stages = stageNameField.getPickListValues();  
7:                 for(Schema.Picklistentry stage : stages){  
8:                      opportunityStages.add(stage.getValue());  
9:                 }  
10:            }  
11:            return opportunityStages;  
12:       }  
13:       private set;  
14:  }  

Visualforce


First start by downloading Multiselect  and adding the JavaScript and CSS to the page. Add them to the page as follows;

1:  <apex:stylesheet value="{!URLFOR($Resource.tutorials, '/css/jquery.multiselect.css')}" />  
2:  <apex:includeScript value="{!URLFOR($Resource.tutorials, '/js/jquery-1.9.1.js')}" />  
3:  <apex:includeScript value="{!URLFOR($Resource.tutorials, '/js/jquery.multiselect.js')}" />  

The look and feel of the examples here come from the default themes and styles. But you can apply you own themes and styles to suit the look and feel of your application.

Also note the version of jQuery I am using above. I am mentioning this here, because while preparing this article I initially used the latest version of jQuery which as of this writing is 1.11.1. But I couldn't get this to work together with the current version of Multiselect and had to downgrade my jQuery Version .1.9.1. So if you choose a different version of jQuery and run into an "Uncaught type error, undefined is not a function", then you might have to switch to a different version of jQuery.

Next build your drop-down as follows;

1:  <apex:outputPanel id="opportunityStageMultiSelectContainer">  
2:       <select id="opportunityMultiSelect" style="display:none" multiple="multiple">  
3:            <apex:repeat value="{!opportunityStages}" var="stage">  
4:                 <option value="{!stage}">{!stage}</option>  
5:            </apex:repeat>  
6:       </select>  
7:  </apex:outputPanel>  


The <apex:repeat> component is used to iterate over the list of stage names built in the Controller and an option is created for each stage name. The most important attribute here is the multiple attribute defined on the select element. This attribute is what makes multiple selection of options possible.

Créme de la Créme


And of course my favorite Créme de la Créme. Here we initialize the Multiselect plugin and specify options. These options define how the plugin will build our multiselect drop-down and how it will behave.


1:  $("#opportunityMultiSelect").multiselect({  
2:    selectedList: 3,  
3:    selectedText: "# of # selected",  
4:    noneSelectedText: "Opportunity Stages",  
5:    click: function(event, ui){  
6:            getSelectedStages();       
7:    },  
8:    checkAll: function(){  
9:            getSelectedStages();  
10:    },  
11:    uncheckAll:function(){  
12:            getSelectedStages();  
13:    }  
14:  });  

When the page is initially loaded and no options have been selected yet, the noneSelectedText is displayed. As options are selected, they are displayed until the number in selectedList is reached. After this the selectedText kicks in and says how many options have been selected so far;


SelectedText
Selected Options at the top

We have also defined what will happen when the user selects a single option, or all by clicking on Check all or none by clicking on Uncheck all. Although they all call the same function getSelectedStages() in our example, you could implement specific customized behavior here which suits your needs and the requirements you are working with.

1:  function getSelectedStages(){  
2:       var selected = $("#opportunityMultiSelect").multiselect("getChecked");  
3:       var stages = [];  
4:       $.each(selected, function(index, stage){  
5:            stages.push(stage.value);  
6:       });  
7:       passSelectedStagesToController(JSON.stringify(stages));  
8:  }  


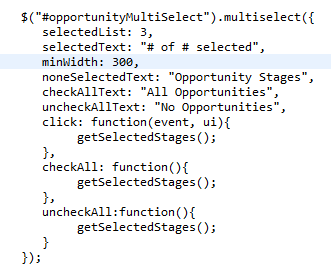
In the getSelectedStages() method, we call the method getChecked() provided by the plugin to get all selected options. Please check out the documentation for all methods available and options you can set. For example, you can also use the options to set the text to be displayed in place of Check all  in this case All Opportunities


Finally we create an array, fill it with the selected stage names, create a JSON string and pass this to an actionFunction passSelectedStagesToController;


1:  <apex:actionFunction name="passSelectedStagesToController" action="{!retrieveOpportunitiesForSelectedStages}" rerender="hiddenDiv">               
2:       <apex:param assignTo="{!selectedStages}" name="selectedStages" value=""/>  
3:  </apex:actionFunction>  


The JSON String with the stage names is assigned to a String property on the Controller selectedStages. Notice that we have a rerender attibute on the actionFunction. You will normally rerender the portion of the display which is showing your results. Here the rerender attibute also plays a very important role. Without this attribute, the selectedStages parameter will not be set. As of this writing, I am guessing that this is a Salesforce Bug. A little googling has revealed that quite a few people have this problem as well. Also specifying the onComplete attribute on the actionFunction component will also cause the selectedStages parameter to be set. Very spooky stuff.

On the controller, in the action method specified in the actionFunction, you can then collect the stage names into a Set.

1:  public void retrieveOpportunitiesForSelectedStages(){  
2:       Set<String> stages = (Set<String>)JSON.deserialize(this.selectedStages, Set<String>.class);  
3:  }  


This set could then be used in your the WHERE condition of your SOQL query using the IN keyword. I will leave this up to you. But in this way you will be able to retrieve and pass only those Opportunities belonging to a particular stage back to the page.


Conclusion

I hope that from this article you were able to get a feeling of the end-to-end process of implementing the multi-select feature using, Apex, Visualforce and jQuery's Multiselect plugin. I hope that you are now able to appreciate the possibilities you have from using this. Challenge this article and propose alternative solutions and as any open questions you may have. Hope you enjoyed reading

Friday, May 30, 2014

Visualforce page with Custom Drop-down Menu (Select) using jQuery Minimalect

Introduction


In HTML we have the select element which can take either the option element or the option elements could be grouped using the optgroup element. These elements are used to build drop-down list. These list could be read-only or they could be used as drop-down menus to trigger all sorts of actions.

With Visualforce and jQuery you can take these elements to the next level, by using them to build simple yet powerful drop-down menus with the following features

  • filtering menu elements by typing
  • keyboard navigation
  • nicer styled controls and support themes


Apart from these slick usability features, a more technical aspect is the fact that such a drop-down menu can be used to control the amount of data loaded at anyone time. This can be very helpful in situations where we are required to load thousands of records at once.

The jQuery Library Minimalect will be used for the demonstrations in this article. You drop-down text box will look like this;


To begin this discussion on Minimalect, I would like to stress out a feature of Minimalect which is really cool. With Minimalect you can filter the options of the drop-down by simply typing in text in the text field shown above. As you type the text, the drop-down elements are filtered and matches are displayed. So you don't have to look through all options to find what you want. This is very useful if you have a long list and scroll bar


OK let's dive in.

Use Case

To demonstrate how you would use Visualforce, jQuery Minimalect and Apex to build a simple, powerful and user friendly drop-down menu, we will use the standard Account object. The idea is to group Accounts according to industries and then pass this information to the Visualforce page. This information is then used to build the drop-down menu. Imagine that Accounts in your organisation are huge, possibly with hundreds and even thousands of contacts and you want to browse these contacts by account by industry. So your drop-down menu will group accounts by industry, and when a user selects an account from the drop-down, the contacts for that account will be retrieved and returned to the page.

Apex: Back-end


First we will use the Schema.DescribefieldResult to get the Industry field on Acounts and then get it's values. Always avoid hard-coding picklist values, so that you wouldn't have to touch you code when the picklist is modified.

1:  public List<String> retrieveIndustryValuesOnAccount(){  
2:       List<String> menuItems = new List<String>();  
3:       Schema.Describefieldresult industryFieldOnAccount = Account.Industry.getDescribe();  
4:       List<Schema.Picklistentry> industries = industryFieldOnAccount.getPickListValues();  
5:       for(Schema.Picklistentry industry : industries){  
6:            menuItems.add(industry.getValue());  
7:       }  
8:       return menuItems;  
9:  }  

Then create a map in which each entry will be a list of Accounts belonging to a single industry. Then make sure that industries that do not have any Accounts are excluded;

1:  public Map<String, List<Account>> accountMenuItemsByIndustryMap { get; set; }  
2:  public void accountDropDownMenuItems(){  
3:       accountMenuItemsByIndustryMap = new Map<String, List<Account>>();  
4:       for(String industry : retrieveIndustryValuesOnAccount()){  
5:            accountMenuItemsByIndustryMap.put(industry, new List<Account>());  
6:       }  
7:       for(Account acct : [SELECT Name, Industry FROM Account]){  
8:            if(acct.Industry != null){  
9:                 accountMenuItemsByIndustryMap.get(acct.Industry).add(acct);       
10:            }  
11:       }  
12:       for(String industry : accountMenuItemsByIndustryMap.keySet()){  
13:            if(accountMenuItemsByIndustryMap.get(industry).isEmpty()){  
14:                 accountMenuItemsByIndustryMap.remove(industry);  
15:            }  
16:       }  
17:  }  


Visualforce: Front-end


On the Visualforce page, we will begin by adding the Minimalect resources (JavaScript and CSS) to the page. Download and add them to the Static Resources and then reference them like this;

1:  <apex:includeScript value="{!URLFOR($Resource.tutorials, '/js/jquery.minimalect.js')}" />  
2:  <apex:stylesheet value="{!URLFOR($Resource.tutorials, 'css/jquery.minimalect.css')}" />  

Then build your drop-down like this. Notice that we use the <apex:repeat> element to step through the map and then group the accounts according to industry by using the optgroup element. We then further step through the list of Accounts still using the <apex:repeat> element and add the account names to the optgroup using the option element.

Notice the class and onclick attibutes added to the option element. We will go into those in a minute.

To better customize Minimalect, it is important to understand what happens behind the scenes. Whenever you use Minimalect, all menu items are enclosed in a list of list (ul) element and the options become list elements (li) and all this is wrapped in a div element. A list element is also added for the optgroup element. A text field is added as the first element in the list. It will hold the selected option and will be used to filter the options in the drop-down.
All these elements get default CSS classes and styles applied. You can set a bunch of options to customize these CSS classes when you initialize Minimalect. You can then apply custom styles to your drop-down.

1:  $(document).ready(function(){  
2:       $("#accountMenu").minimalect({placeholder:"Accounts",class_container:"minict_wrapper minict_larger"});  
3:  });  

While initializing Minimalect in the code above, we set the class_container option such that the CSS classes minict_wrapper and minict_larger will be added to the main div element which holds the drop-down menu items. The option placeholder is the default text which will be displayed when no option is select. Check out the documentation for all the options you can set.

CSS class="hidden" on each option element


Remember the CSS class="hidden" attribute defined for the option element? Well there is a good reason for this. Whenever our drop-down menu is displayed we want the options to be hidden and only be shown when we click on the industry.

To do this we have to add an onclick event listener to the each optgroup list element created by Minimalect. Minimalect unfortunately do not have an option to set this which in my opinion would be a very good idea. So you have two options; the more difficult one will be to work with JavaScript addEventListener or attachEvent (for Versions of IE older than IE9) to add an onclick event to the created list items. If you did not define any custom options for class_group (optgroup element), the default would be minict_group. So you can select all list items with this class and add an onclick to them.
The second option is much simpler and is what I did here. I went all Tarzan on the Minimalect library and added my onclick directly in the Minimalect code. I am a very pragmatic guy but I wouldn't recommend this unless you understand what you are doing fully and the library license gives you the permission to do this, else you might get yourself in some serious trouble.

The function I added to the optgroup li element onclick event listener uses jQuery's nextUntil() to get all entries (Accounts) in a single group toggle them, i.e show if hidden or hide if shown.

1:  function dropdownAccordion(obj){  
2:       $(obj).nextUntil(".minict_group").toggleClass("hidden");  
3:  }  

onclick="passSelectedAccountIdToController('{!acct.Id}');" on each option element


The event listener added to each option element, i.e. each item of the drop-down menu, calls an actionFunction element and passes it the Id of the selected Account.

1:  <apex:actionFunction name="passSelectedAccountIdToController" action="{!retrieveAllContactsForSelectedAccount}">               
2:       <apex:param assignTo="{!selectedAccountId}" name="selectedAccountId" value=""/>  
3:  </apex:actionFunction>  

The actionFunction causes a property on the controller selectedAccountId to be set with the Id of the selected account. After this the action function retrieveAllContactsForSelectedAccount on the account is then called to retrieve all contacts for the selected account.

CONCLUSION


If you leverage the power of jQuery properly on your Visualforce page, you can build trully amazing applications. My colleague argues that it is always best to stick to the standard elements provided by Salesforce as much as possible. Am sure the folks at SFDC will love him for this. I also agree totally. But there are times you will have to think out of the box to give your clients what they want. If your out of the box thinking leads you to JavaScript and jQuery be sure not to try to reinvent the wheel and use tools like Minimalect to make your life easy, while still building powerful applications.
I hope that you were able to get a feel of what you can do with Minimalect from this article. I challenge you to take a closer look at Minimalect whenever you need it because what I have done here is just brushing the tip of the Iceberg. If you have alternative solutions of Libraries you have use in the past, please let us know about them.
Thanks for reading

Thursday, May 29, 2014

How to implement Infinite / Endless Scroll on your Visualforce Page

Introduction


Infinite scroll is a web technique which automatically and seamlessly loads more data as the user scrolls the page until all the data has been loaded. Anyone who uses Facebook knows what I am talking about. Other Web applications have implemented some sort of a semi infinite scroll, where a portion of the data is loaded as you scroll and after a while a "Load More" button is displayed. Checkout the comment section on Youtube to see this. Using the power of Visualforce & Ajax (with jQuery & JSON) and with Apex as your Backbone, you can build Force.com pages that implement these techniques easily. I will show you how. But first let's examine why you would want to use infinite scroll at all.

So what are the advantages of using infinite scroll and why is being adopted by many web applications?


  • it enhances User Experience which in my opinion is the most important factor when building web applications. Your users do not have to page back and forth through pages to find what they need. I know people who will argue that, letting users page gives them more control over the way they consume their content which makes them feel in control. I partially agree. As with every other feature or functionality on your page, you will have to give it some considerable thought before implementing it. Is continuous scroll going to help with usability? if yes then implement it. Also build in other features to help users jump to specific parts of the page. You do not want your users having to scroll all the way back to the top after they have scroll tons of data right to the end. This will have the opposite effect to what you are trying to achieve. So the bottom line is, if continuous scroll can add usability to your application, then use it. My motto is DON'T DO IT JUST BECAUSE YOU CAN.
  • the second and most important reason is the fact that, you relieve your system from having to handle large sets of data all at once. This is also directly tired to the first advantage. If you have been using Facebook heavily for the past 5 years, imagine how much time, it will take for Facebook to load all of your timeline data at once; this would include Text, images, comments, likes, etc. and all the necessary calculations required to link all the stuff you shared, stuff shared with you, links etc ... Despite the high speed Internet we have these days, it will take forever. So if you have large sets of data or require extensive work in the background while loading this data, and you do not want your users having to manually page through data, then endless or infinite scroll is you best option. 


With Infinite Scroll your will be able to load only portions of the entire data set at a time and load more as the user scrolls. This relieves your system from having to do a lot of heavy data retrieval at once which will most definitely be very resource exhaustive and at the same time prevents your users from long waiting periods while their data is prepared and loaded. It is seamlessly loaded as they scroll. Nice!

Implementation

I will not attempt to reinvent the wheel but will used a JavaScript / jQuery Library called Endless Scroll for my demonstration. I choose this because it is open source and quite easy to use.

Use Case

Build a custom account Page which displays account information 10 at a time. As the user scrolls, load more accounts, always 10 account records at a time.

Apex: Back-end

I will first of all show you how to prepare you data. In my opinion the front-end discussion makes more sense when you know what the back-end is doing

Controller - AccountBrowserController.cls


In the controller we will use the StandardSetController to retrieve the account information from the database. The StandardSetController can either take a list of sObjects or a query locator. With both methods you can retrieve up to 10000 records. The only difference is that with the query locator, you will receive a beautiful LimitException if you attempt to retrieve more than 10000 records whereas, with the sObject list, no exception is thrown. The list of records is just truncated.

For this demonstration, I used the query locator like this;
1:  public static final Integer PAGE_SIZE = 10;  
2:  public static Apexpages.Standardsetcontroller setCon {  
3:       get {  
4:            if(setCon == null){  
5:                 String query = 'SELECT Id, Name, AccountNumber, Site, OwnerId, ParentId, Ownership, Industry, AnnualRevenue, Type, Rating, Phone, Fax, Website, TickerSymbol, NumberOfEmployees, Sic FROM Account ORDER BY Name ASC';  
6:                 setCon = new Apexpages.Standardsetcontroller(Database.getQueryLocator(query));  
7:            }  
8:            return setCon;  
9:       }  
10:       set;  
11:  }  
With the StandardSetController, you can define how many records should be loaded with each subsequent call setPageSize(Integer). See the constant defined in line 1 above. You will probably want to set your limit a little higher. I am using 10 here because I do not have many accounts in my Dev Org.
The StandardSetController knows how many records your query will return in total and depending on the page size you set it has functions you can call to check if there is still more data to be loaded getHasNext(). You can set the page number setpageNumber(Integer) or get the number of the current page getPageNumber(). You can also request the records for the current page getRecords() or for the next page by using next(). These are the functions we require for our implementation as shown below;

1:  public static AccountWrapper buildScrollData(Integer currentPageNumber, Boolean getMore){  
2:       if(setCon != null){  
3:            setCon.setPageSize(PAGE_SIZE);  
4:            setCon.setPageNumber(currentPageNumber);  
5:            if(getMore){  
6:                 if(setCon.getHasNext()){  
7:                      setCon.next();  
8:                      List<Account> accts = (List<Account>)setCon.getRecords();  
9:                      if(accts != null && !accts.isEmpty()){  
10:                           AccountWrapper aw = new AccountWrapper(setCon.getPageNumber(), setCon.getHasNext(), true, accts);  
11:                           return aw;  
12:                      } else {  
13:                           AccountWrapper aw = new AccountWrapper(setCon.getPageNumber(), setCon.getHasNext(), false, null);  
14:                           return aw;  
15:                      }  
16:                 } else {  
17:                      AccountWrapper aw = new AccountWrapper(setCon.getPageNumber(), setCon.getHasNext(), false, null);  
18:                      return aw;  
19:                 }  
20:            } else {  
21:                 //Initial Call. Load the first number or records according to pageSize  
22:                 AccountWrapper aw = new AccountWrapper(setCon.getPageNumber(), setCon.getHasNext(), true, (List<Account>)setCon.getRecords());  
23:                 return aw;  
24:            }  
25:       }  
26:       return null;  
27:  }  

The first page returned is always 1. So initially we will set the current page to 1 and getMore to false and then use the getRecords() to retrieve the first 10 records (Line 22). In subsequent calls, if there are still more pages, we will use next() to set out counter up and getRecords() to retrieve the next 10 records. Note that we are wrapping these records using AccountWrapper Class before returning them to the page. This enables us to add more controls (hasMore, noRecords) to our page as shown below;

1:  public class AccountWrapper{  
2:       public Integer pageNumber { get; set; }  
3:       public Boolean hasMore { get; set; }  
4:       public Boolean noRecords { get; set; }  
5:       public List<Account> records { get; set; }  
6:       public AccountWrapper(Integer currentPageNumber, Boolean more, Boolean noRecs, List<Account> recordsForSinglePage){  
7:            pageNumber = currentPageNumber;  
8:            hasMore = more;  
9:            noRecords = noRecs;  
10:            records = recordsForSinglePage;  
11:       }  
12:  }  

If noRecords is true, the page doesn't make a call to the server.

Initially when the page is loaded, we retrieve the first set of records using the code below;

1:  public static String accountList {  
2:       get {  
3:            AccountWrapper aw = buildScrollData(1, false);  
4:            accountList = JSON.serialize(aw);  
5:            return accountList;  
6:       }  
7:       private set;  
8:  }  

For easy processing on the page, we return the account list as a JSON (JavaScript Object Notation) String.

Subsequent calls to the server will use JavaScript to get more data. This is possible by using JavaSccript Remoting for Apex Controllers. This enables the page to call Controller methods directly from JavaScript which is not possible with standard Visualforce components like actionFunction, actionSupport etc.

The remote method definition in the Controller is accomplished by using the @RemoteAction annotation;

1:  @RemoteAction  
2:  public static AccountBrowserController.AccountWrapper getMore(String currentPageNumber, String hasMore){  
3:       Integer pageNumber = Integer.valueOf(currentPageNumber);  
4:       Boolean more = Boolean.valueOf(hasMore);  
5:       if(more){  
6:            AccountBrowserController.AccountWrapper aw = AccountBrowserController.buildScrollData(pageNumber, more);  
7:            return aw;  
8:       }  
9:       return null;  
10:  }  

Here we do not need to send back a JSON string, because our remote function automatically converts our AccountWrapper object to a JavaScript object - cool stuff. A collection would automatically be converted to a JavaScript array and primitive types are also converted to their JavaScript equivalents. Really nice stuff.

So this concludes our Controller. Now let's look at what you need to do on the page to your continuous scroll up and running.

Visualforce Page: front-end


The first thing you need to do, is make sure you have jQuery and Endless Scroll included in your page. Usually I prefer to download these and have them in the Static Resources. Others prefer to include this from CDN. Not me.

1:  <apex:includeScript value="{!URLFOR($Resource.tutorials, '/js/jquery-1.11.1.min.js')}" />  
2:  <apex:includeScript value="{!URLFOR($Resource.tutorials, '/js/jquery.endless-scroll.js')}" />  

When the page is initially loaded I set the global variables, that I will use to make the call to the JavaScript remote function on the controller. This is necessary, because the remote function on the controller does not have access to the controllers other data and we will need to manually let it know the page number for instance.

1:  $(document).ready(function(){  
2:       var data = {!accountList};  
3:       currentPageNumber = data.pageNumber;  
4:       hasNext = data.hasMore;  
5:       noRecords = data.noRecords;  
6:       if(data.noRecords != false){  
7:            buildAccountRow(data.records);  
8:       }  
9:  });  
10:  var currentPageNumber = 0;  
11:  var hasNext = false;  
12:  var noRecords = false;  

I the use a javaScript function to build my data elements and then insert them to a div. As more records are retrieve using JavaScript remoting on the controller, the same function will be called to build more DOM elements (in this case tables) and append them to the DOM elements that already exist there.

1:  function buildAccountRow(records){  
2:       $.each(records, function(){  
3:            var moreposts = '';   
4:            moreposts += '<table class="grid_2_table" style="width:90%; border-style:solid;">';  
5:            moreposts += '<tr width="50%">';  
6:            moreposts += '<td><div class="padding_bottom_10"><span class="bold">Owner : </span>' + this.Owner + '</div></td>';  
7:            moreposts += '<td><div class="padding_bottom_10"><span class="bold">Rating: </span>' + this.Rating + '</div></td>';  
8:            moreposts += '</tr>';  
9:            moreposts += '<tr width="50%">';  
10:            moreposts += '<td><div class="padding_bottom_10"><span class="bold">Account Name: </span>' + this.Name + '</div></td>';  
11:            moreposts += '<td><div class="padding_bottom_10"><span class="bold">Phone: </span>' + this.Phone + '</div></td>';  
12:            moreposts += '</tr>';  
13:            moreposts += '<tr width="50%">';  
14:            moreposts += '<td><div class="padding_bottom_10"><span class="bold">Parent Account: </span>' + this.AccountNumber + '</div></td>';  
15:            moreposts += '<td><div class="padding_bottom_10"><span class="bold">Fax: </span>' + this.Fax + '</div></td>';  
16:            moreposts += '</tr>';  
17:            moreposts += '<tr width="50%">';  
18:            moreposts += '<td><div class="padding_bottom_10"><span class="bold">Account Number: </span>' + this.AccountNumber + '</div></td>';  
19:            moreposts += '<td><div class="padding_bottom_10"><span class="bold">Website: </span>' + this.Website + '</div></td>';  
20:            moreposts += '</tr>';  
21:            moreposts += '<tr width="50%">';  
22:            moreposts += '<td><div class="padding_bottom_10"><span class="bold">Account Site: </span>' + this.Site + '</div></td>';  
23:            moreposts += '<td><div class="padding_bottom_10"><span class="bold">Ticker Symbol: </span>' + this.TickerSymbol + '</div></td>';  
24:            moreposts += '</tr>';  
25:            moreposts += '<tr width="50%">';  
26:            moreposts += '<td><div class="padding_bottom_10"><span class="bold">Type: </span>' + this.Type + '</div></td>';  
27:            moreposts += '<td><div class="padding_bottom_10"><span class="bold">Ownership: </span>' + this.Ownership + '</div></td>';  
28:            moreposts += '</tr>';  
29:            moreposts += '<tr width="50%">';  
30:            moreposts += '<td><div class="padding_bottom_10"><span class="bold">Industry: </span>' + this.Industry + '</div></td>';  
31:            moreposts += '<td><div class="padding_bottom_10"><span class="bold">Employees: </span>' + this.NumberOfEmployees + '</div></td>';  
32:            moreposts += '</tr>';  
33:            moreposts += '<tr width="50%">';  
34:            moreposts += '<td><div class="padding_bottom_10"><span class="bold">Annual Revenue: </span>' + this.AnnualRevenue + '</div></td>';  
35:            moreposts += '<td><div class="padding_bottom_10"><span class="bold">SIC Code: </span>' + this.Sic + '</div></td>';  
36:            moreposts += '</tr>';  
37:            moreposts += '</table>';  
38:            moreposts += '<br />';  
39:            $('#records').append(moreposts);  
40:       });  
41:  }  
42:  <apex:pageBlock title="Account Browser">  
43:       <div id="account_container">  
44:            <apex:outputPanel id="wrapper">  
45:            <div id="records">  
46:            </div>  
47:            </apex:outputPanel>  
48:       </div>  
49:  </apex:pageBlock  

JavaScript remoting requires that the method be called from the page (invocation) and the page must provide a callback function to handle the response from the server.

1:  function getMore(){  
2:       if(noRecords === true){  
3:            AccountBrowserController.getMore(currentPageNumber, hasNext, function(result, event){  
4:                 currentPageNumber = result.pageNumber;  
5:                 hastNext = result.hasMore;  
6:                 noRecords = result.noRecords;  
7:                 if(result.noRecords != false){  
8:                      if(event.status == true){  
9:                           buildAccountRow(result.records);  
10:                      }  
11:                 }  
12:            });  
13:       } else {  
14:            hasNext = false;  
15:       }       
16:  }  

If there are more records, we then call the getMore remote function passing in the current page number and the Boolean variable indicating that there is more data. The call back returns the results and the status of our request. If the request was successful, we build our DOM elements and add them to our page.We also update our global variables.

Créme de la Créme


My french is not that good, but I think Créme de la Créme means something like "the best part" and that is where we are now; the best part and core this article.

This is how to set up your endless scroll;

1:  $(document).endlessScroll({  
2:       fireOnce: true,  
3:       fireDelay: 1000,  
4:       bottomPixels: 10,  
5:       content: function(p){  
6:            getMore();  
7:       },  
8:       ceaseFireOnEmpty: true  
9:  });  

Endless Scroll hast a number of options you can set. These options let you fine tune the behavior of the endless scroll. Please check out the documentation to know more about available options. Here I have set a few options;
  • fireOnce: fire only once until the excution of the current event is completed

  • fireDelay: delays subsequent firingby 1 second. Within this period, endless scroll is disabled.

  • content: content to insert after each call

  • ceaseFireOn Empty: endless scroll is disabled when the content returned is empty.


As mentioned above, there are a few more options you can set to control the behavior of your endless scroll implementation. Play around with this a little and understand how everything works. Then set the options that work for you.

Conclusion

As mentioned in the introduction, endless or infinite scroll is a web technology that is very useful, but nonetheless it should be used carefully and only after considerable thought. There are other JavaScript libraries that can help you implement infinite scroll easily. Do your homework and choose what you think will work for you best. The Back-end solution will probably not change much.
I do my best to give my readers an end-to-end solution, that I have tested and it works. You can then use this solution as the basis of your own implementation. I hope you were able to learn something from this article. feel free to challenge it and may be even offer better solutions which will benefit us all especially future readers. I thank you for taking the time to read.

Friday, May 23, 2014

Salesforce.com Certified Force.com Advanced Developer - How to pass the first part

Introduction


Yesterday I passed the multiple-choice part of the Force.com Advanced Developer Exam. Anyone who think this exam is a walk in the park, I will laugh in your face hahahaha. That said, I had a lot of fun preparing for and taking this exam. Since all the information is still fresh in my head, I will like to let you know how I prepared and what my strategy was. I passed right? so it can't be harmful to let you know how I did it.

General Facts


  • 69 multiple-choice questions
  • time: 120 minutes
  • passing score: 73%
  • fee: $400
  • retake: $200

Go here for more information on the exam

Preparation


First you need to download the study guide so that when you are going through the material you know where to place extra emphasis. Get the study guide here.

To prepare for the exam, I used a total of 5 resources, two pdf files, two videos and the Visualforce cheatsheet, plus 1 year of experience in active development on the Force.com platform:


This seems like awfully little. While doing initial research prior to taking the exam, I discovered that many sites or people giving advice about this exam name so many resources that are in my opinion just not necessary. The problem with trying to study everything you can lay your hands on is information overload and the inability to sort throw your knowledge during the exam. Because I concentrated only on the 5 resources named above, I was able to relate specific questions to specific sections in the resources I had used to study which helped me remember the information quickly and precisely. This is not possible if you read 10 different documents on the subject. Bear with me and take this minimalist approach. This is minimalist only in terms or resources. In terms of Knowledge, these resources cover everything you need for the exam and much more. So let's dive in.

The Workbooks


The Visualforce Workbook is an excellent place to start. Even if you have been developing Visualforce for years and think it is boring, still go through it. Even if you do not get any "Aha" moments, you might get some explanations that will make what you know stick more and stand out during the exam. Don't forget, exam conditions are not necessary an accurate measure of how good you are. Being nervous is enough to make many people forget stuff.

The Visualforce workbook


It is about 45 pages and you can go through this in a day of two. Make sure you go through it and master all the concepts. Take notes while you read especially when you have the feeling and know from reading the study guide that something is especially important. Writing it down gives your brain time to register it more and you might recall it later much easily. Every topic in the workbook is extremely important. I would like to say you pay special attention to

  • StandardSetController - QueryLocator - limit on records you can pull?
  • StandardController Class  - what are the methods?
  • Visualforce oder of execution - what happens when a Visualforce page is initially loaded? what is called first in the controller? Constructors?, action methods? getters? setters?
  • Visualforce templates - what are these and what standard components do you need? ever heard of apex:insert, apex:define and apex:composition? what exactly does these components do in the templating process?
  • Visualforce component - know components in and out. Dream about them
  • View State -  what is this? how can you reduce it? ever heard of the transient keyword? ever heard of the private access modifier for instance variables?


but I am not saying you should pay any special attention to these topics. Pay attention to every word in the work book. But know this - if you cannot answer the few questions I have asked above on the morning of the exam, don't bother going

The Apex workbook 


On the other the Apex workbook is almost twice as big as the Visualforce workbook. The same applies here. Read all the topics very carefully and be sure you grasp all the concepts. If anything is not clear at anyone point in time, stop and Google that particular topic. Take about 10 to 15  minutes and read a little more on the topic. You will always find an online resource that explains it in terms that anyone can understand. Did I already mention how much I love Google search and the internet. Nope? ok I am doing that now. I love Google search and the Internet.

Every topic in the workbook is important and is part of the exam, not Kidding. I would like to say pay special attention to,


  • Email Services  - how do you setUp email services? how do you test them? - InboundEmail? InboundEnvelope?
  • Testing and Debugging - what does the @isTest annotation mean and what special advantages does it have? what is the syntax of test methods? should they be private or public?, how should good test methods look like and what should they test?, where should their test data come from? how about StartTest and StopTest methods? when should you use them and what are their implications? how would you test a Standard controller? or a Page?
  • Deployment - how do you do deployment on the Force.com IDE, what do you need to deploy from a sandbox to production? change sets? deployment connection?
  • Dynamic Apex - alot on this ... what is Schema Describe? how can you use it and what advantages does it have? what is Dynamic SOQL? what is Dynamic SOSL? what is Dynamic DML? if you are given snippets of code, can you differentiate between these?
  • Asynchronous Apex - what is the @future Annotation and what does it mean? does it have limits? what are these limits? can you use it the Web Services callouts? how?. What are batch jobs and how and when should you use them? Batchable Interface, Batchable Context, start(), execute, finish() ....  help .... what is all this?
  • Order or execution - what happens when a record is updated? when exactly are system validations fired etc. 


I am not saying you should pay any special attention to these topics, you should pay special attention to every word in the workbook. BUT if you cannot answer all the questions asked above on the morning of the exam, then don't bother going. YOU WILL FAIL miserable.

Online trainings 


You will need to register to get access to the online tranings.

When you have read and understand ALL of the stuff in the workbook, it is time to use the online training videos to make the stuff stick in your memory. The videos will go through all the topics again in more detail and give examples. Even if you are an experience developer, I can tell you now that you will have a lot of Aha moments. How does a normal List (List<Account>) differ from an array List (Account []). Are they even different? What is the difference between writing Account [] in Apex and in Java. Coming from a Java background it was awesome for me to learn the difference. If you do not already know it, go find out and enjoy!

If you have been working with Saleforce.com or developing on the Force.com platform for a while you can skip the first 35 minutes of both online trainings and go straight to the juicy stuff. These give an introduction to the Recruiting Application used to teach the concepts and an Introduction to the Force.com platform. The Recruiting Application is in my opinion irrelevant, concentrate on making the concepts stick. And if you do not already know the Force.com platform very well, then you are wasting your time reading this.

Remember the study guide? Yes by now you should now what to lay special emphasis on. So while going through the videos what i did was, I took screen shots of slides which I thought were of importance. I would open the sidebar with the transcript before taking the screen shot. So I have the explanation as well. I will explain later how this helped me. I also took screen shots of all knowledge check questions and answers. To take screenshots i used Fireshot which is an excellent plugin for taking screenshots. I took me 3 to  4 seconds to get a screen shot.

So I organised these screen shots into different folders;


I later arranged them into a word document for studying quickly.

NOTE: Now that I am done with the exam, I have deleted these screen shots from my hard drive and have neither distributed nor shared them in any form. And you shouldn't either. These is copyrighted material belonging to SFDC. That said let's move on


Day Of Exam


On the night before the exam go to bed early and sleep enough. Anything you haven't studied, you haven't studied period. Some people always try to stuff themselves with knowledge right before the minute when the exam starts.

But if you rest enough and go to the exam relaxed and confident, you will be in a better position to remember what you learnt and be able to apply common sense to questions that are not obvious. As an example; in the exam I was asked to select which method wasn't part of the StandardController Class; new(); save(); edit(); view();. Do you know the answer? well I didn't but I still got the points for this question because I was able to apply common sense couple with what i already know about the StandardController Class. When you are in an instance of the StandardController Class you already have a record you are dealing with (StandardController.getRecord() in a controller extension), so why would you ever need a new method?. This was my reason and I picked new() and I was right.
Even if you have to guess, which is the case at times in multiple-choice exam, you can use your good judgment to be able to make educated guesses. At times if you are able to pay attention, questions that you had answered before will give you glues to questions that are still to come. But this is possible only if your brained is rested and relaxed and not stress and panicky. So rest well before the exam.

Do you remember those few screen slides you prepared while listening to the online training and the knowledge check questions? this is when you need them. After a good nights rest, a healthy breakfast, you will take about an hour to go through this stuff. This has two effects;


  • you will revise some core and maybe elusive concepts
  • you will be able to boost you confidence even more. You will already know most of the stuff on these slides and will brush through the knowledge checks like nobody's business. This will boost your confidence and put you in the perfect mind set for the exam


Yes what about the Visualforce cheatsheet? I haven't mentioned it all. This would also be a good time to look at it. It is two pages in total and briefly summarizes all available standard components. There were two questions in the exam I knew for a fact were right because I read this cheat sheet.

After this, you are ready for the exam. If you have followed my tips the fullest, you will be ready to take and past the exam. But don't forget, all the preparation in the world doesn't help you if you do not have and maintain the right attitude during the exam.

During the Exam


You are sitting in the exam room, you are on question 5 and have already marked two questions for review and it looks like you might be marking 5 for review as well. What do you do? start panicking would be the worst thing you can do, because all the preparation would have been in vain. Yes it may not be a walk in the park as we would expect after such a great and intensive preparation but don't forget that it was a great and intensive preparation. You are prepared for the exam. That is all that you have to remember. Then keep your cool and as the Brits will say "Carry On".

Try to mark as few questions for review as possible because if you apply your knowledge, common sense and instinct, you will be fine. There is no point in second guessing yourself. When I finished, I had marked only three questions for review and out of these I changed only one. So don't second guess yourself.

Keep your cool right through till the end and you will be fine.

Conclusion


I did the exam in 100 minutes, marked only three questions for review and passed the exam. I had a lot of fun preparing and taking the exam and learned a lot in the process. This means that my method worked and that is why I am sharing it with you.
However I am aware that people are different and gather, assimilate and consume information and knowledge differently. That is why these methods might not work for you exactly the way they did for me but you should try it. Most importantly find out what works for you. Do no hesitate to challenge my methods and share your own learning techniques with us especially in regard to preparing for and taking the DEV 501 exam. Happy learning and thanks for reading.

Thursday, May 15, 2014

Introduction to Visualforce

Introduction

The other day a friend came across my blog and asked me; what is this Visualforce and Apex thing you are blogging about anyway?

Good question I thought. She probably still wouldn’t understand this post, but at least one would expect a blog with the title „Apex & Visualforce 101“ to begin with a short introduction to Apex and Visualforce. My bad. This post gives a brief introduction to Visualforce, what it is, why you should use it, when to use it and how to use it. A separate Post will tackle an introduction to Apex.

What is Visualforce?

Once upon a time, in a far far away kingdom, only traditional Web technologies like HTML (HyperText Markup Language), CSS (Cascaded Style Sheets), JavaScript, Flash etc. were used to develop views. 
A View can be defined as a representation of the information you wish to display to your users. This would most likely be the information that users will see on their browsers when they visit your website or use an application you have developed on the Force.com platform. So what has all this got to do with Visualforce? Read on!

With the need to build more powerful Views more quickly, came the realization that HTML was pretty limiting. HTML is tag-based, meaning it offers a bunch of tags which can be used to represent different types of information in different ways. But these tags offer only the very basic functionality you would need. To be fair, there are still quite a number of sites out there written purely in HTML but the amount of code, time and effort required to build and maintain such a site or application would be monstrous. 
Just like HTML, Visualforce is a tag-based programming construct that is used to build views. But it is much more powerful, because it has a larger number of tags that group common functionality together and it has been designed to optimally work with the Salesforce.com and the Force.com platform. What this means is, the way Visualforce interacts with the business logic layer which provides the information to display on the view, handles navigation, user input, communication with other systems code, asynchronous(AJAX) possibilities etc. have all been optimized to run in the most efficient way possible using Visualforce

Another web programming paradigm that can be used to understand what Visualforce is and its role in the whole development process of an application is the Model-Viel-Controller or simply MVC pattern.

Model-View-Controller (MVC)

MVC as the name says is made up of the Model, the View and the Controller.


Model


This is also sometimes called the data layer. It refers to the data on which your application will be built. If you were constructing a house, you could think of this as the foundation on which everything else will be built. The data that makes up this layer will most often reside in a database. On the Force.com platform, this layer consists of all standard and custom objects, their fields and the relationships between them.

View


This is the presentation layer and is used to display or gather information to the end user of your application. Visualforce pages constitute one of the main implementations of this layer. In Salesforce other Views include, Visualforce components,  page layouts and tabs.

Controller


This is the business logic layer. It is used to connect the Model to the View. It does this by getting the dataset required by the View from the Model, updating the dataset on the Model when the View changes, performing other business related task like sending emails, performing validations, page navigation etc. In Salesforce this business logic layer consist of Visualforce Controllers, Apex Classes and Triggers, Workflow Rules etc.

The main advantage of using the MVC pattern is that it leads to an effective utilization of resources by simplifying division of labour during the software development process. Different teams can concentrate on developing different layers of the application.

Visualforce fits nicely into the MVC pattern and is used to develop the View which constitutes what the user sees and ways he can interact with or consume what he see.


Why you should use Visualforce


Visualforce is a powerful tool for developing User Interfaces on the Force.com platform. Below are the most important advantages offered by this powerful GUI (Graphical User Interface) programming paradigm;

  • Performance: if there is only one reason why you should use Visualforce, then this is it. Visualforce is designed to display with the same performance as standard pages. The reason for this is, Visualforce is compiled on the server and therefore not tied to the limitations of your browser. 
  • Visualforce offers many tags out of the box which you can used to build pages with or without the look and feel of the standard pages. These range from tags for building tables, charts, to tags for use with chatter, live agent, Visual Workflow etc. Adding a related list to you page is as simple as using the related list tag and specifying which related list to add. You can link specific page elements to your data such that these fields respect all validation rules, data types etc. You can pull in the chatter feed for a record with these tags and let users follow records directly from your Visualforce page. These tags always begin with the “apex” keyword such as in the example below
  <apex:outputText value="{!account.Name}" styleClass="companyName"/>  


         Please click here to view the complete reference of the powerful tags offered by Visualforce.
  • Visualforce is extensible. If the Visualforce component reference does not have what you want, you can build your own component. Sometimes you simply want to build a reusable component that you can use in several different pages. This components can then be added to your page like this;
 <c:OpportunityPopup />  

         In this example, OpportunityPopup represents the component name.

         You could also define and register your own namespace unique to your company, data,                   process etc; and then use this to reference your components.

 <projectJubilee:CustomerBadgeInfo />  
         
         CustomerBadgeInfo would be your component which you could access using your unique              namespace projectJubilee.
  •  One of the most important reasons why Visualforce could be useful for your application is that it gives you the possibility of displaying information or data from systems external to your current salesforce implementation. Due to governor limits and the fact that some business cases don’t allow data to be in Salesforce, may be for legal reasons, or the fact that it is needed just by a very small subset of users, it doesn’t always make sense to add your data to Salesforce. Instead you will have the data in an external system and retrieve it using the Web Services API or outbound callouts and display the information when it is needed on a Visualforce page.
  • Visualforce can be used effortlessly and seamlessly with all common web technologies such as HTML, JavaScript, CSS, Flash and Flex. This is because at run time when you author your page and hit save, the Visualforce tags on your page are parsed on the server and an HTML page is returned and displayed. Right-click on your browser and click “view page source” to verify this. For this reason you can combine the best of Visualforce with the best of other technologies to provide your users with even more powerful and interactive applications.

Initial Steps


There are a couple of ways to author your Visualforce pages. Before you begin, it is important to identify how you will like to create and edit Visualforce pages. I will mention three important once here. These are;
  • Development Mode
  • Developer Console
  • Eclipse

Development mode


To begin, you will have to check the box for Development Mode on your user profile if you intend to create web pages directly from the browser. To create an Apex Page, simply go to the browser, clear everything after “.com” and append “/apex/nameOfYourPage” and press enter. An error message will display showing the the page does not exist yet and you will be give the posibility to create the page right from your browser


Then click on “Create Page nameOfYourPage” to create your Visualforce page. You will notice that your screen is divided into two. In the second half of the screen, you will be able to write your Visualforce code. The main advantage of using this method is, whenever you make changes to your page and save,  you will immediately see the changes in the section of the page above. You also have a link to the  complete Visualforce component reference on the right side of the screen just above the development area.

Developer Console


If you intend to do more than create Visualforce pages, it might be preferable to use the Developer Console. What I mean by more is, if you will also be creating Apex Classes which is very likely since you might be creating Controllers as well, running Apex test classes, checking Apex code coverage and covered code segments, executing SOQL Queries, checking debug logs etc. The Developer Console offers you all these possibilities and much more.


To access the Developer Console, click on your name at the top right side of the platform and then on Developer Console.

Force.com IDE (Eclipse)


Salesforce offers a plugin, the Force.com plugin for Eclipse IDE. This is my personal preference. Most of the things you can do with the Developer Console, can also be done in Force.com IDE. But Force.com IDE offers a bit more possibilities than the Developer Console. If you intend to do versioning as with SVN Subversion then use Eclipse with the Force.com IDE plugin. Do you want to be able to deploy between different environments or orgs? Then use the Force.com IDE. The Force.com IDE also has a Schema with which you can view the complete data Model for you org which can be very useful when you wish to find out the relationship between your objects.


Look here on installation instructions for the Force.com IDE.

Now that we know what Visualforce is, why to use and how to use it let us answer the question when  to use it.

When you should use visualforce


You should use visualforce when you require a custom look and feel with your application. The standard look and feel is pretty limited in most scenarios and you can’t alter it much. You can configure page layouts to add fields of different data types, add sections and related list, links and buttons, but that is it more or less it. With Visualforce the type of View you can build is not limited in anyway.
You may want to build customised pages the retain the look and feel of standard pages or you may want to build customised pages and apply you own styles. Combining the power of Visualforce together with Force.com Sites you can build powerful Web applications that do not look anything like the Salesforce platform. Just by setting a single attribute you can disabled all Salesforce style sheets and apply yours.

So use Visualforce whenever you need a customised view with or without the look and feel of Saleforce.com platform, maybe to pull together information from different objects on to a single view, pull information from external sources onto you views, mash up your views with applications from external sources e.g. Google Maps, build powerful web pages together with Force.com Sites etc. 

The possibilities and indeed amazing.

How to use Visualforce


Visualforce can be used in the following main ways;

  • Links: You can have custom links open up your Visualforce pages when clicked. A use case could be to pull data from an external source and display it to the user.
  • Standard buttons: Visualforce pages could be built to replace the standard detail and edit salesforce pages. The standard “New” and “View” buttons can then be configured to use these Visualforce page.
  • Custom buttons: Custom buttons could be created and attached to specific Visualforce pages. The page layout could then be customised and the custom button added to the page. Clicking on the button opens the Visualforce page
  • Custom Tabs: Visualforce pages could be created and then tabs created for these pages. Users can then add the tabs to applications as they would any standard tab. This tab then gives access to the Visualforce page.
  • Visualforces pages could also be embedded within standard page layouts. This would be done, by creating a Visualforce page and then customize a standard page layout and adding this Visualforce page to it, usually in a section of its own. A common use case I have seen very often of this is adding a map to a standard page layout
  • You can use Visualforce to build pages for your Force.com Site. You could then either expose information and data to your users or to the general public e.g. product information which could be viewed by everyone.

Controllers


A discussion on Visualforce without mention controllers is like talking about floating houses. You will not see them very often except you are in a Disney movie called Up. Visualforce Controllers or simply Controllers play a major role when building Visualforce pages. This is because they hold all the business logic required to retrieve and make datasets available to the page and validate and update this dataset so it can be persistent to the model or data layer when need. Controllers are not limited to performing data manipulation task (DML operations). Controllers can be used to control navigation, perform all sorts of validation, send emails, upload files from the user’s computer to Salesforce or Systems external to Salesforce (such as Google cloud, Dropbox etc), perform outbound callouts, Web services etc.

Note however that although most Visualforce pages you will come across will have a controller, not all Visualforce pages require one. An example of a Visualforce page that may not require a controller is one that embeds a Visual Workflow in the page which doesn't depend on data from any object in the system. This is mostly the case with Visual Workflow built to gather surveys or perform some sort of assessment. The standard guest user profile which is created whenever a Force.com site is created can then be configured to store the survey response on a custom object in Salesforce.

There are two types of controllers; standard and custom controllers. Controller extensions can be used to extend both standard and custom controllers.

Standard Controllers


Every object in Salesforce, be it a standard or custom object has a standard controller which is responsible for the functionality used on the standard pages such as editing and saving a record. To define a standard controller, we use the StandardController as follows

 <apex:page StandardController="Opportunity" sidebar="false" title="Opportunity Report">  
      <h1>THIS IS A DRAFT OPPORTUNITY REPORT FOR TEST PURPOSES</h1>  
 </apex:page>  

The StandardController attribute takes the name of the object whose Controller it will use. The standard methods of this controller such as the save method are now available for use within the page and will behave exactly as if the user were on a standard Salesforce page.
If the user intends to add a bit more control to the way the data should be presented or wants to control the navigation within the page, he will normally add a controller extension to the already existing controller.

Controller Extensions.


Controller Extensions are added with the attribute “extensions”. As the name says, they are used to extend the functionality of the controller already present within the page, be it a standard or custom controller. But it is more common to use them with standard controllers.

 <apex:page standardController="Account" recordSetVar="accounts" extensions="AccountPagination">  
 </apex:Page>  

Several extensions can be added to a single page. Take not that only overridden methods in the first controller will be called. This is often a pitfall for many people so beware; else you might spend hours searching for a bug where there is none.
The constructor of the extension muss have an argument which initializes the controller which it is extending. Using this controller, the extension can then have access to the record which will be displayed on the page as shown here;

 public OpportunityEmailOnClosedCtr(Apexpages.StandardController stdController){  
       stdController.addFields(new List<String>{'StageName', 'Email_Recipients__c', 'TrackingNumber__c', 'Email_Content__c'});  
       this.opportunity = (Opportunity)stdController.getRecord();  
 }  

One thing worth mentioning here is the “addFields” method in the controller above. For optimization purposes, Salesforce always only returns the fields that are queried. For this same reason it is not possible to do something in SOQL (Salesforce Query Language) like “SELECT * FROM Account”. You always have to explicitly query what you want. So if you do not use a field on the Visualforce page, the record fetched in the constructor will not contain any values for this field. However you might want to use this field in the controller extension. Before people used to add hidden fields to the page to obtain values for these fields in the record. This introduces security issues to your page and might make your page unnecessarily bulky (always think about View State and  governor limits). Instead use the “addFields” method and specify what additional fields you need. How great is this.

Custom Controllers


These types of controllers are used when we want complete control over the way our page is going to behave. We might want to create, update and delete related records or customize navigation to and from other pages. We will normally use custom controllers for these situations where we require heavy customisations on our page and the dataset we want to display to the user. For example, you might need to wrap your data in some sort of a wrapper object so as to add more functionality to your data which may not need to be persisted e.g adding checkboxes to your data to let users select particular records.
Custom controllers are defined user the “controller” attribute

 <apex:page controller="PositionController" recordSetVar="positions" sidebar="false" showHeader="false">  
 </apex:page>  

Custom controllers have a no argument constructor. If you however need to perform some initialisations when your Visualforce page is loaded, write an init method and use the “action” attribute of the page definition to call your init function

 <apex:page standardController="Test_Centers__c" extensions="Test_Center_Controller" action="{!Init}" Sidebar="false">  
 </apex:page>  

Finally, take note that you are not allowed to perform any DML operations in the constructor of your controllers.

Datasets, Data Bindings (Properties) & Action Bindings


After this brief introduction on controllers it will be very useful to mention the concept of getters and setters and bindings.

Anyone who has ever worked with Java Beans before is very familiar with the less code, more work approach using the concept of properties with public getters and setters. This same concept is used in Visualforce Controllers, the only difference being that the properties are something halfway between a variable and a getter or setter.

 public List<TeamMembers> OpportunityTeam { get; set; }  
 public String chosenFiscalYear{get; set;}  
 public String chosenRegion {get; set;}  

These getter and setter properties are used to present and maintain the dataset from the data layer to the page. These properties make sure that the dataset is always consistent at all times so that the same data seen by the page is the same data on the controller.
Normally when the Visualforce page loads, the getter properties are called and they present the page with the data it needs. If the user changes a value on the page and hits a button tied to an action such as “save”, the setter for that value is first called and the value is updated. The “save” action is then called. When the action is called, the value is already updated. Very important! So very important to remember, all getters are called when the page is loaded and setters are always called before the action functions run.
It is this functioning of the getter and setter property that we refer to as data binding. Data binding keeps the dataset consistent between the controller and the view.
Action binding is the binding of specific action methods to elements in the view. Action methods could be bound to a button, a link, an actionFunction etc.

 <apex:actionFunction name="retrieveSearchedSession" action="{!retrieveSearchedSession}" oncomplete="HideEventChatterFeed(); setSessionSearchTitle('{!searchTerm}'); hideBlockUI();" rerender="recordCounter">  
      <apex:param assignTo="{!searchSessionId}" name="searchSessionId" value=""/>  
      <apex:param assignTo="{!searchTerm}" name="searchTerm" value=""/>  
 </apex:actionFunction>  

In the example above, the action method retrieveSearchedSession after the setters for the properties searchSessionId and searchTerm have been called to update these values in the dataset. The retrieveSearchedSession  action can then use these values to perform the SOSL (Salesforce Object Search Language) query and update the dataset with the required records.

Other Important Visualforce concepts


To conclude this discussion on Visualforce pages, we will introduce a few key concepts that you should always keep in mind when building Visualforce pages.

View State and Transient Variables

As mentioned above data binding uses properties to maintain a consistent dataset between the controller and the Visualforce page. The Visualforce page is however just HTML code and as we all know HTML is stateless. So how is a consistent state of the dataset maintained between the Visualforce page and the controller? The answer is View State. The View State contains all properties required to maintain state between the page and the controller. This View State is passed back and forth between the page and the controller whenever they communicate with each other.
For this reason it is very important to keep the size of the View State as small as possible. One on the main ways to do this is to use the transient keyword on variables or properties that will not be added to the View State. We mentioned the controllers ‘addFields” method above to add fields not accessed in the page but needed in the controller. If you define properties to hold values from these fields, such properties would be good candidates to be decorated with the transient keyword.
Always think about what you are doing properly. This will make you more efficient as you will avoid common pitfalls from the onset

Limits


The size of each Visualforce page is limied to 15 MB. This should be more than enough for most Views you will need to create. If you find yourself hitting this limit, then you are doing something seriously wrong. One very important limit is the 135 KB size of the View State. 

System mode vs user mode


While standard pages and pages utilizing only the standard controller operate in user mode, meaning all profile based permission sets and sharing rules are respected, custom controllers and controller extensions operate in system mode, meaning profile based permission sets and sharing are not respected. So always remember to add the “with sharing” to your custom controller or controller extension definition if you want profile based permissions and sharing to apply on your Visualforce page.

Dynamic Visualforce


There are times when you might need to customize the View to show information based on the profiles of the users or on a combination of values from different records. In these cases, the “rendered” attribute used to show and hide sections of the page might just not cut it anymore or might even just result in more complexity. In such cases you should consider using dynamic Visualforce. In this case the Visualforce mark-up is built in the controller and sent to the page to be dispayed. Salesforce however stresses the fact that, this is not the main way Visualforce is meant to be used. I stress this point too.

Conclusion

Having been using Visualforce for a while now, I can say; at times it blows my mind how easy it is to create stunning web applications using Visualforce. Anyone who has done traditional web development (without the aid of constructs like Visualforce, JSP, JSF) will very much appreciate the possibilities you have with Visualforce and how much time and effort it saves you. I hope from this article you were able to get a feeling of the possibilities you have with Visualforce. Leave a comment that might help others looking at this post in the future. Thanks for reading